Schedule Framework 扩展调度器
相较于 Scheduler Extender ,调度框架通过将所有的调度过程 “插件化“ 。
目前为止,Scheduler Framework 的开发需要重新 build 整个调度器的代码,还不支持一个 “热插拔” 的方式,这与 Scheduler Extender / Multi-scheduler 的 “无侵入“ 的扩展方式是不一样的。
调度框架
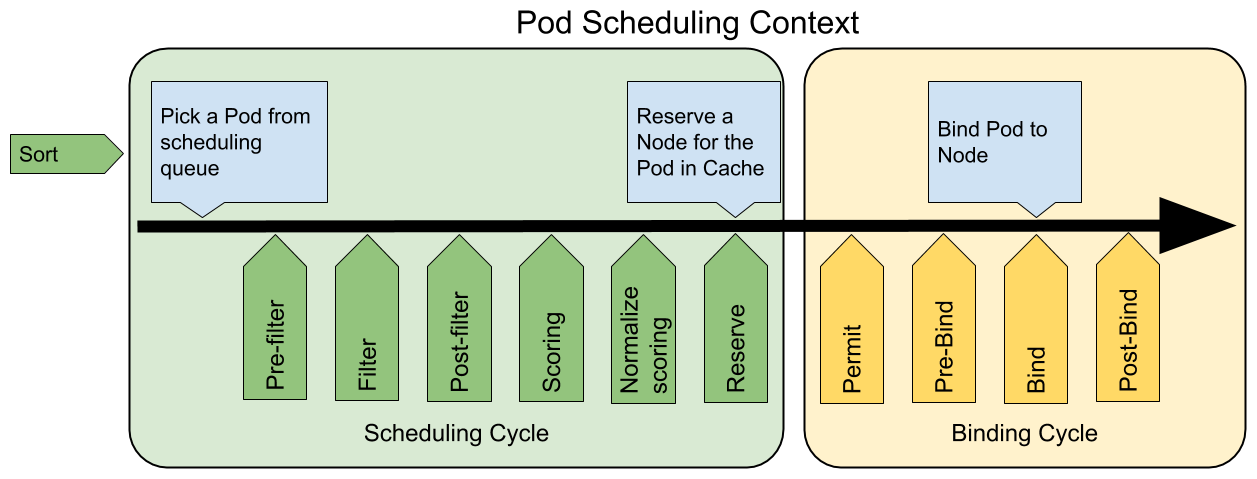
下图展示了调度框架中的调度上下文及其中的扩展点,一个扩展可以注册多个扩展点,以便执行更复杂的有状态的任务的调度。

scheduling framework extensions
各扩展点的说明如下:
QueueSort扩展用于对 Pod 的待调度队列进行排序,以决定先调度哪个 Pod,QueueSort扩展本质上只需要实现一个方法Less(Pod1, Pod2)用于比较两个 Pod 谁更优先获得调度即可,同一时间点只能有一个QueueSort插件生效。Pre-filter扩展用于对 Pod 的信息进行预处理,或者检查一些集群或 Pod 必须满足的前提条件,如果pre-filter返回了 error,则调度过程终止。Filter扩展用于排除那些不能运行该 Pod 的节点,对于每一个节点,调度器将按顺序执行filter扩展;如果任何一个filter将节点标记为不可选,则余下的filter扩展将不会被执行。调度器可以同时对多个节点执行filter扩展。Post-filter是一个通知类型的扩展点,调用该扩展的参数是filter阶段结束后被筛选为可选节点的节点列表,可以在扩展中使用这些信息更新内部状态,或者产生日志或 metrics 信息。Scoring扩展用于为所有可选节点进行打分,调度器将针对每一个节点调用Soring扩展,评分结果是一个范围内的整数。在normalize scoring阶段,调度器将会把每个scoring扩展对具体某个节点的评分结果和该扩展的权重合并起来,作为最终评分结果。Normalize scoring扩展在调度器对节点进行最终排序之前修改每个节点的评分结果,注册到该扩展点的扩展在被调用时,将获得同一个插件中的scoring扩展的评分结果作为参数,调度框架每执行一次调度,都将调用所有插件中的一个normalize scoring扩展一次。Reserve是一个通知性质的扩展点,有状态的插件可以使用该扩展点来获得节点上为 Pod 预留的资源,该事件发生在调度器将 Pod 绑定到节点之前,目的是避免调度器在等待 Pod 与节点绑定的过程中调度新的 Pod 到节点上时,发生实际使用资源超出可用资源的情况。(因为绑定 Pod 到节点上是异步发生的)。这是调度过程的最后一个步骤,Pod 进入 reserved 状态以后,要么在绑定失败时触发 Unreserve 扩展,要么在绑定成功时,由 Post-bind 扩展结束绑定过程。Permit扩展用于阻止或者延迟 Pod 与节点的绑定。Permit 扩展可以做下面三件事中的一项:- approve(批准):当所有的 permit 扩展都 approve 了 Pod 与节点的绑定,调度器将继续执行绑定过程
- deny(拒绝):如果任何一个 permit 扩展 deny 了 Pod 与节点的绑定,Pod 将被放回到待调度队列,此时将触发
Unreserve扩展 - wait(等待):如果一个 permit 扩展返回了 wait,则 Pod 将保持在 permit 阶段,直到被其他扩展 approve,如果超时事件发生,wait 状态变成 deny,Pod 将被放回到待调度队列,此时将触发 Unreserve 扩展
Pre-bind扩展用于在 Pod 绑定之前执行某些逻辑。例如,pre-bind 扩展可以将一个基于网络的数据卷挂载到节点上,以便 Pod 可以使用。如果任何一个pre-bind扩展返回错误,Pod 将被放回到待调度队列,此时将触发 Unreserve 扩展。Bind扩展用于将 Pod 绑定到节点上:- 只有所有的 pre-bind 扩展都成功执行了,bind 扩展才会执行
- 调度框架按照 bind 扩展注册的顺序逐个调用 bind 扩展
- 具体某个 bind 扩展可以选择处理或者不处理该 Pod
- 如果某个 bind 扩展处理了该 Pod 与节点的绑定,余下的 bind 扩展将被忽略
Post-bind是一个通知性质的扩展:- Post-bind 扩展在 Pod 成功绑定到节点上之后被动调用
- Post-bind 扩展是绑定过程的最后一个步骤,可以用来执行资源清理的动作
Unreserve是一个通知性质的扩展,如果为 Pod 预留了资源,Pod 又在被绑定过程中被拒绝绑定,则 unreserve 扩展将被调用。Unreserve 扩展应该释放已经为 Pod 预留的节点上的计算资源。在一个插件中,reserve 扩展和 unreserve 扩展应该成对出现。
以上调度功能扩展点对应到 Kubernetes 源码的路径: pkg/scheduler/framework/v1alpha1/interface.go ,可以在该文件中找到各接口的定义:
1 | type Plugin interface { |
在对功能点进行扩展时,需要注意导入相应接口,并将接口中的方法全部实现。
举例:扩展 Filter 插件
例如要对 Filter 阶段进行扩展,那么首先需要在程序中定义一个新的 MyFilter :
1 | type MyFilter struct { |
*Args 为自定义的结构体,用于接收调度器运行时传入的参数;
framework.FrameworkHandle 提供集群相关的数据与工具,用来调用 framework 中的函数。
查看上文,扩展 Filter 插件需要实现 filter 方法:
1 | // 接口绑定 |
注意这里需要将 Filter 的结果通过 framework.Status 的方式返回给调度框架,最后 return nil 其实也是相当于返回 framework.NewStatus(framework.Success, "") 。
插件扩展的逻辑基本就是这样,后文会详细介绍完整的调度器扩展方案。
使用调度框架扩展调度器
在调度框架下实现调度器扩展大致分一下几个步骤:
- 实现自定义插件 foo ,插件中包含若干个扩展点,实现对应方法;
- 将自定义插件 foo 注册到到调度框架中;
- 编译生成新的调度器及其镜像;
- 通过调度器参数
KubeSchedulerConfiguration控制插件各扩展点的启用/关闭; - 运行新的调度器,YAML 文件中需要包含 RBAC、ConfigMap、ServiceAccount 以及调度器的部署文件。
插件实现
以实现一个 First-Fit 的调度算法为例,我们选取利用率最高的 Node 进行分配,涉及这个过程其实只需要在 Score 部分扩展功能即可。
代码部分可以参见:fusidic/Greedy-Scheduler
在 Kubernetes v1.19 中,调度器的所有功能都完成了转向 Scheduler Framework 的插件化,本文的代码很大程度上也是参照源码进行练习的。
在 pkg/scheduler/framework/plugins/noderesources 中保存着 Filter 与 Score 扩展点相关的代码,其中 resource_allocation.go 文件中定义了一个 “打分器” :
1 | type resourceAllocationScorer struct { |
注意到 “打分器” 中包含一个类型为函数的成员 scorer ,在 “打分器” resourceAllocationScorer 中也实现了一个方法 score ,其中调用了 scorer 这个成员函数。
这么做是为了将 “打分” 这个过程以函数的形式扩展,在这个路径中,存在多种打分的策略,包括 “最多分配”、“最少分配” 以及 “平均分配” 的策略。
每种打分策略中都维护了一个 score plugin ,通产来讲,完成一个插件需要包括三个部分:
插件的定义:
1
2
3
4
5type Greedy struct {
args *Args
handle framework.FrameworkHandle
resourceAllocationScorer
}在这个结构体的定义中,“继承“ 了
resourceAllocationScorer,当然更准确的说法其实是 “委托” (delegation)。接口的实现:
根据要扩展的对象,需要实现相应的方法,首先需要对
ScorePlugin规定的接口进行实现:1
2
3
4var (
_ framework.FilterPlugin = &Greedy{}
scheme = runtime.NewScheme()
)包含一个
Score方法的实现:1
2
3
4
5
6
7
8
9// Score rank nodes that passed the filtering phase, and it is invoked at the Score extension point.
func (g *Greedy) Score(ctx context.Context, state *framework.CycleState, pod *v1.Pod, nodeName string) (int64, *framework.Status) {
nodeInfo, err := g.handle.SnapshotSharedLister().NodeInfos().Get(nodeName)
if err != nil || nodeInfo.Node() == nil {
return 0, framework.NewStatus(framework.Error, fmt.Sprintf("getting node %q from Snapshot: %v, node is nil: %v", nodeName, err, nodeInfo.Node() == nil))
}
return g.score(pod, nodeInfo)
}这里隐式调用了
resourceAllocationScorer中的score函数成员,当然,这个匿名函数我们还并没有实现,我们可以根据这个函数签名实现一个自定义的打分算法,并将这个函数作为参数传到&Greedy{}中。Greedy.New()方法:每个插件都需要的一个
New()方法:1
2
3
4
5
6
7
8
9
10
11
12
13
14
15
16
17
18
19
20
21
22func New(configuration runtime.Object, f framework.FrameworkHandle) (framework.Plugin, error) {
args := &Args{}
if err := frameworkruntime.DecodeInto(configuration, args); err != nil {
return nil, err
}
resToWeightMap := make(resourceToWeightMap)
resToWeightMap["cpu"] = 1
resToWeightMap["memory"] = 1
klog.V(3).Infof("get plugin config args: %+v", args)
return &Greedy{
args: args,
handle: f,
resourceAllocationScorer: resourceAllocationScorer{
Name: "NodeResourcesMostAllocated",
scorer: greedyResourceScorer(resToWeightMap),
resourceToWeightMap: resToWeightMap,
},
}, nil
}在这个方法中,将自己打分算法的实现
greedyResourceScorer作为参数传入了结构体中 (该函数返回一个匿名函数)。
注册插件
在 v1.19 版本中,Kubernetes 已经将所有调度功能实现了插件化,因此我们需要做的事情很简单,只需要在默认调度器的基础之上,通过 pkg/scheduler/algorithmprovider/registry.go 中的 NewRegistry() 函数将我们的插件注册进去即可。
当然在 Kubernetes 中其实提供了更加友好的接口来为这种 Out-of-tree 的插件进行实例化,即位于 cmd/kube-scheduler/app/server.go 中的 WithPlugin() 函数,它将我们的插件加入到一个 map 中,该 map 即 runtime.Registry 用来维护一个 name->func 的映射。
1 | type PluginFactory = func(configuration runtime.Object, f v1alpha1.FrameworkHandle) (v1alpha1.Plugin, error) |
而这个 Registry 其实就是最终我们在创建 Scheduler 时需要用到的 Option :
1 | type Option func(runtime.Registry) error |
所以说到底,如果不去追究里面的调用关系的话,关于注册自定义插件,你只需要知道一点:
1 | func Register() *cobra.Command { |
编译与生成镜像
在考虑编译前,首先得有个函数入口,完成插件的注册和调度器的运行:
1 | func main() { |
通过 Go Modules 我们可以很方便的引入 Kubernetes 的库,可以直接使用 go build ./cmd/scheduler 开始编译,此处编译产生的可执行文件,是一个完整的调度器,可以直接运行,或者放入镜像文件中。
Dockerfile 如下:
1 | FROM debian:stretch-slim |
当然,你也可以采用 “分阶段编译”。
调度器参数设定
在 Scheduler Extender 扩展方式中我们提到过 KubeSchedulerConfiguration ,用来对调度器进行配置,通常以 ConfigMap 的形式传入调度器 Pod 中。
基本的使用,可以参考这篇文档,更多的配置项还是需要查看 [KubeSchedulerConfiguration](https://godoc.org/k8s.io/kubernetes/pkg/scheduler/apis/config#KubeSchedulerConfiguration) 里的字段。
1 | apiVersion: v1 |
运行调度器
编写 YAML 文件,包含 RBAC、ServiceAccount(与 API Server 交互的 token)、ConfigMap、Deployment。
具体查看:https://raw.githubusercontent.com/fusidic/Greedy-Scheduler/master/deploy/greedy-scheduler.yaml
参考
- Create a custom Kubernetes scheduler, https://developer.ibm.com/articles/creating-a-custom-kube-scheduler/
- 自定义 Kubernetes 调度器, https://www.qikqiak.com/post/custom-kube-scheduler/
- PluginConfig, https://godoc.org/k8s.io/kubernetes/pkg/scheduler/apis/config#PluginConfig
- Scheduler Configuration, https://kubernetes.io/docs/reference/scheduling/config/
- scheduler-plugins, https://github.com/kubernetes-sigs/scheduler-plugins
- KubeSchedulerConfiguration, https://godoc.org/k8s.io/kubernetes/pkg/scheduler/apis/config#KubeSchedulerConfiguration